
How to connect the CTF/CTP with SCSI interface in EagleRIP
1. Insert the SCSI adapter into the PCI slot of your computer.
2. First, please power on your CTF/CTP(for example, ECRM imagesetter with SCSI interface, Founder DL8500 CTP, FujiFilm Luxel V9600CTP etc.,) then power on the PC with EagleRIP installed, please make sure your PC can find CTF/CTP device during booting.
3. Install EagleRIP program.
4. Plug in EagleRIP dongle.
5. Please have ASPI 457 driver installed successfully, this is very important, this driver will send commands to SCSI host adapter, ASPI package is located at Tools\ASPI457 folder of EagleRIP 4.x installation CD. Please follow the installation guide provided in the installation guide in the ASPI package to install it. When installation program prompts to reboot the computer, please reboot it. Please check whether ASPI is installed successfully in window of "ASPI Installation Verification", and check the register value according to the installation guide.
6. If you use Adapter AHA-2944UW SCSI adapter, please install “Adaptec AHA-2944UW SCSI adapter update” program which is located at “\Win2KDrivers\Adaptec AHA-2944uw Win2k Update Kit” of EagleRIP 4.x installation CD. This is the updated driver for AHA-2944UW SCSI adapter, it will solve the problem that the printing speed is slow. If you use other model SCSI adapter, please do not install it.
7. If you use LSI 8751D SCSI adapter, in order to make the system more stable, please change the setting of SCSI BIOS for 8751D as below:
(1) Power onCTF/CTP.
(2) Restartthe computer which has EagleRIP installed.
(3) PressCTRL+C (there will be a prompting information) when the OS is searching forSCSI device under DOS mode.
(4) SelectSYM53C875 and press enter.
(5) SelectDEVICE SELECTION and press enter.
(6) SelectFFEI VX9600CTPM (for example you connect Founder DL8500) and press enter, thenchange the setting as below:
SYNC RATE OFF
WIDTH 8
DISCONNECT OFF
READ WRITE I/O TIMEOUT 20
SCAN FOR DEVICE AT BOOT TIME YES
SCAN FOR SCSI LUNS YES
QUEUE TAGS ON
Press ESC to exit and then enter "AFAPTER SETUP" option, set nextitem:
SCAM SUPPORT OFF
8. In EagleRIP 4.01 and above version, we have modified the installation method of FjLuxel device driver in order to automatically connect FiLuxel device.
With this method, the only Fjluxel device type that is installed is Fujifilm Luxel F9000 during the installation of EagleRIP, if you’d like to use other FjLuxel devices, please delete the default Fujifilm Luxel first in Device Manager, exit RIP, then restart it and install the FjLuxel device in Device Manager, and select the device type you like e.g. Fujifilm Luxel F6000 from the device list.
9. In the folder of “Documents\AdapterGuides\” in the EagleRIP installation CD, you can find a PDF file for corresponding device, you can refer to this guide for install and operate the device driver in EagleRIP.
About EagleRIP on Windows Vista
1. From EagleRIP 4.01, it supports to run on Windows Vista, and only support TIFF and Winprint driver.
2. On Windows Vista, please do not install EagleRIP to a folder which contains a blank such as c:\Program files\, otherwise, EagleRIP cannot startup.)
3. On Windows Vista, after you have installed EagleRIP, please make sure UAC is turned off.
a. Go toControl panel\user accounts\ user accounts\turn user account control on or off
b. Uncheck“Use User Account Control (UAC) to help protect your computer”.
c. If youturn UAC on, then you cannot install options in EagleRIP.

4. For TIFF driver, please make sure the folder which saves TIFF file is not “Read Only”, otherwise EagleRIP will report an error when print a job to TIFF file (on any Windows OS).
Print from Mac OS X to Windows via TCP/IP
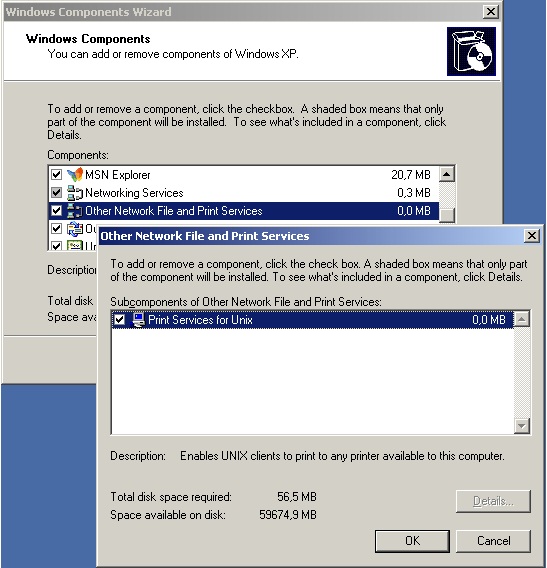
1. Install "Print Services for Unix" on Windowswhich EagleRIP is installed.
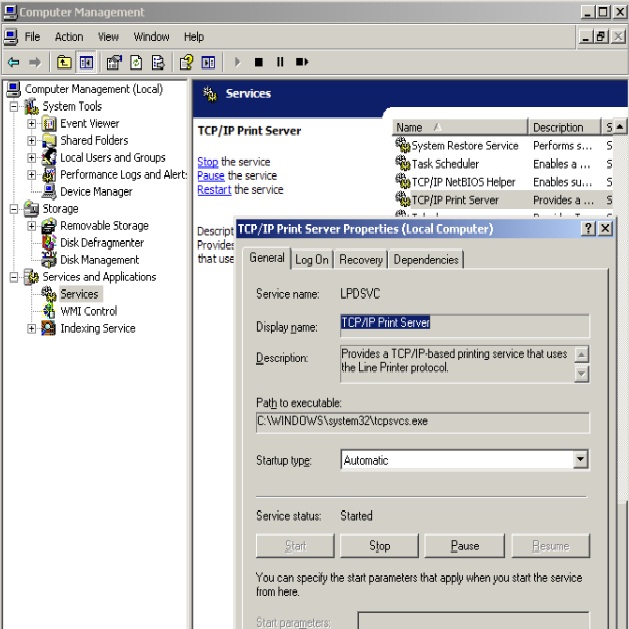
2. Set the Startup type for the "TCP/IP Print Server" Service toAutomatic
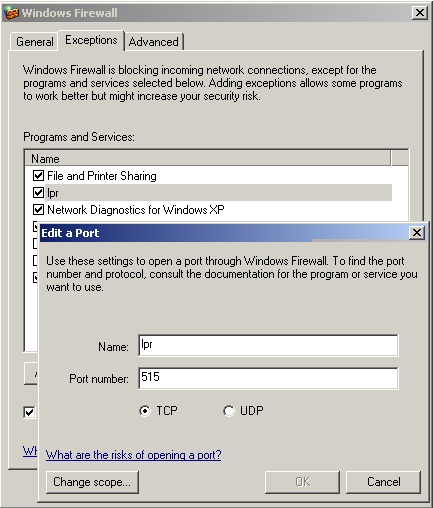
3. Make a Windows Firewall exception on port 515 TCP
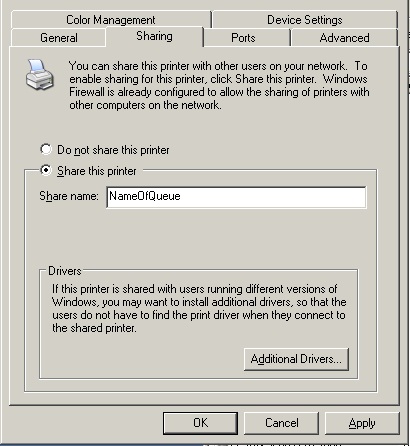
4. Share your printer using a unique share-name
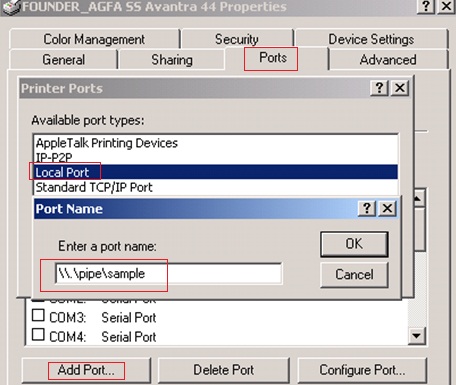
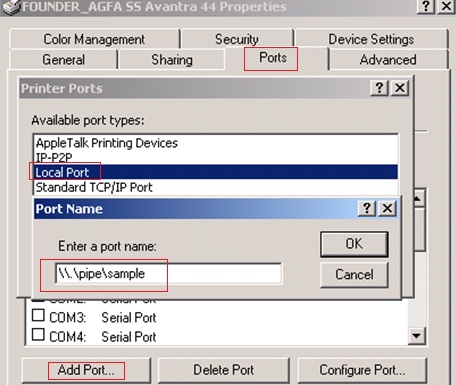
5. Set the printer’s port to a NTPIPE printer, for example you havecreated an input in EagleRIP first (input name is “sample”)
6. Add your printer on Mac OS X using IP
Protocol: Line Printer Daemon - LPD,
Input the IP address of your PC with the shared printer in"Address"
Input the shared-name in "Queue"
Name your printer in "Name" as you like
Select a PPD in "Print using" (You can generate a MAC PPD inEagleRIP, and copy this PPD to MAC)
